
If you have a pair of scissors in your kitchen drawer, chances are they’re dull. Most people’s are, anyway. That’s because very few home cooks know you can sharpen scissors, let alone how to do it. Fortunately, sharpening them is as easy as sharpening kitchen knives.
This article will walk you through how to sharpen kitchen shears at home. We’ll show you five different ways to get these handy household items to cut through food like they did when you first got them. Once you’re done reading our guide, you won’t have a problem with dull scissors ever again.
How to Sharpen Kitchen Shears: 5 Ways
Read through these five ways to sharpen scissors at home and decide which one works best for you. You won't need to go to a professional knife sharpener ever again.
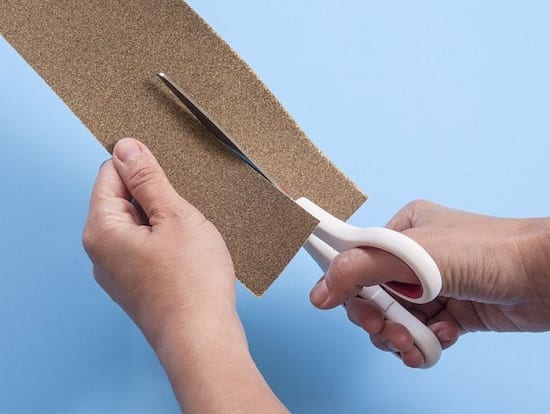
1. Use Sanding Paper
The first sharpening method on this list is surprisingly simple. All you need is a sandpaper sheet (150 to 200 grit is ideal) and a paper towel.
Start by folding the sheet of sandpaper in half so the smooth sides touch. You should end up with the coarse sides on the outside.
Then, grab your dull kitchen shears and cut through the coarse side of the sandpaper ten to fifteen times, making sure to run the full length of the cutting edge through the sandpaper. You can cut the sanding paper more times if you’re still not happy with how sharp the blades have turned out.
Finally, wipe the shear blades with a towel.
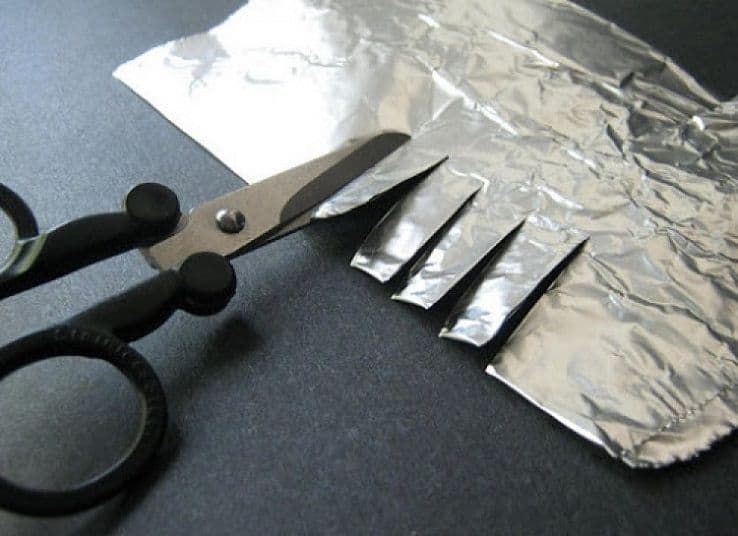
2. Use Aluminum Foil
If you don’t have sandpaper, you can follow a similar method using aluminum foil (or tin foil).
Cut a sheet of aluminum that is at least 10 inches long. Then, fold it lengthwise several times. You want to end up with a relatively thick strip of aluminum foil. The folded layers will sharpen the beveled edge of your dull scissors.
Next, cut through the foil ten to twenty times (or more, if you want them sharper), always making sure the full length of the cutting edge is running through the layers.
Finally, use a towel to wipe the blades before storing your sharpened kitchen scissors.
3. Use a Glass Bottle or Mason Jar
Surprisingly enough, you can use a glass bottle (e.g. a beer bottle) or a mason jar to sharpen scissors.
Hold the jar or bottle firmly with your non-dominant hand.
Then, cut the top of the jar or glass bottle with the kitchen shears. The whole cutting edge of the blade should run against the glass. You won’t need to apply much force or pressure. Of course, this motion might feel awkward at first, but it’s effective.
All in all, you will need fifteen to twenty passes to sharpen the edges of the blade. Yet, if you’re not happy with how sharp the pair of scissors is, you can repeat the process a few more times.
Get a paper towel, wipe the blades, and you’re done.
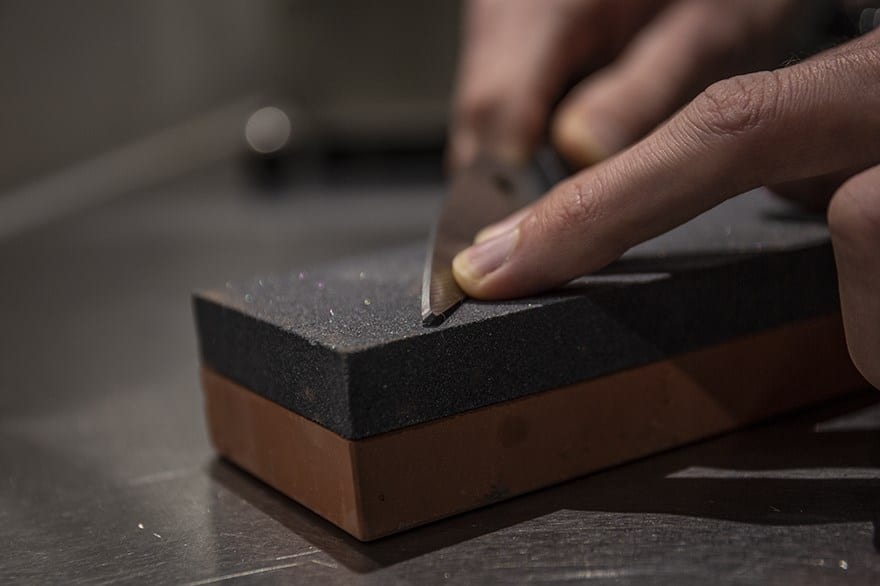
4. Use a Whetstone
If you have a whetstone (also known as a sharpening stone or a bench stone), you can use it to sharpen scissor blades. It's not only good for sharpening kitchen knives!
Lay it on a kitchen towel with the coarse side of the stone facing up.
The next step is optional, but it could help you get a better grip on each scissor blade. If you want, you can separate the shear blades from each other and from the plastic handles.
Next, you will need to sharpen the beveled edge of each blade. Grab one blade with your dominant hand and lay the beveled edge flat against the stone. Slide it across the whetstone in straight, steady motions. Repeat this movement for each of the blades up to twenty times.
Then, you need to repeat the process for the flat edge of the blade. It works the exact same way, except this time there is no beveled edge, so you can simply lay the blade flat against the stone.
Now you can flip over the bench stone so that the fine side of the stone is facing up. Repeat the same stroking movements five times for each side of each blade to finish off the sharpening process.
Finally, wipe the blades with a towel and that’s it.
5. Use a Rotary Tool
Rotary tools also do a great job at sharpening scissors. You can find them at a hardware store. If you decide to follow this method, make sure you also have a vise (or can improvise one) or someone to help you hold the shears in place.
Start by positioning your kitchen scissors upright with the tip of the blades pointing upwards.
Then, assemble your rotary tool and plug it into an outlet.
Next, you need to look closely at the blades. You’ll notice that one side has a beveled edge while the opposite side is perfectly flat. This means that you will have to sharpen the slanted side at a perfect angle (usually 10 degrees, but always following the natural shape of the edge of the blade).
Get your rotary tool and start sharpening each of the blades. Take it slow so you don’t accidentally chip at the blades. Remember to sharpen each side of the blade an equal number of times (e.g. if you do ten strokes on the beveled side of the left blade, do ten strokes on the beveled side of the right blade).
Lastly, cut through a thick piece of cardboard with your newly sharpened scissors to remove the burrs.
Tips to Help You Sharpen Kitchen Scissors
These three tips will make sharpening scissors easier, no matter which method you choose.
Sharpen Both Blades Evenly
When you use sharpening stones and rotary tools, it’s important that you sharpen each scissor blade equally. This means running it across the stone or grinding on it the same number of times. Otherwise, you will end up with one side that is far sharper than the other.
Get the Angle Right
Kitchen shears have a beveled edge. When you sharpen a pair of scissors, you need to do it following the beveled angle.
Always Clean the Blades Afterward
Whether you use a sharpening stone or a sandpaper sheet, you’re bound to get burrs on your scissor blades. They look like microscopic teeth and should be removed. You can do this by wiping the blades on a paper towel or by cutting through a strong piece of cardboard.
And there you have it! Which of these five ways to sharpen scissors will you try on your kitchen shears? Remember, you can even apply these methods to paper scissors, fabric shears, and even pruning shears.


Leave a Reply