When you don’t have an instructions packet at hand, using a coffee urn can feel intimidating. Fortunately, most models are designed in a pretty straightforward way. If you follow this guide, you’ll know how to use a coffee urn in no time. It’ll be no harder than using a traditional home coffee maker.
Table of Contents
Setting Up the Coffee Urn
First things first, set up your coffee urn on a stable and level surface. Whatever surface you’re using needs to be strong enough to hold the weight of the coffee maker once it’s full.
Then, open the lid and remove the stem and basket. You will pour the water directly into the urn and only then reattach the stem and basket.
Preparing the Brew
Now comes the time to prepare the brew. You can use both filtered water and regular tap water. Just make sure you’re always using cold water, as coffee urns don’t run on hot or boiling water.
How Many Cups Should I Make?
We suggest making about 1.5 cups of coffee for every person at your event. This allows room for seconds and for guests not drinking coffee at all.
Once you know how many cups to brew, fill the tank with water up to that line.
Coffee Grounds to Water Ratio
Now that you have water in the tank, place the amount of grounds you need on the basket.
For a strong brew, use 8 cups of ground coffee for every 100 cups of coffee you’re serving. Similarly:
- 24 cups = 2.25 cups of grounds
- 30 cups = 2.75 cups of grounds
- 36 cups = 3.25 cups of grounds
- 40 cups = 3.5 cups of grounds
- 60 cups = 5 cups of grounds
- 80 cups = 6.5 cups of grounds
If you’re going for a milder brew, 6.25 cups of grounds for every 100 cups of coffee is your best bet.
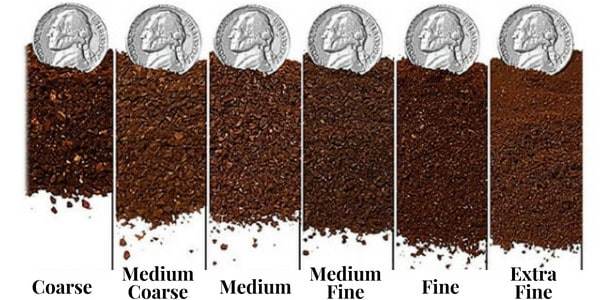
Remember that you’ll need coarse grounds for the brewing process. Most filter baskets have slits too large for fine or medium grinds. Use a coffee grinder for maximum freshness and flavor.
Once the ground coffee is in the basket, insert the stem into the tank and attach it to the basket.
Brewing Times
Each coffee maker is different, but most models have a brewing time of one minute per cup. If you’re brewing 60 cups, for example, start your percolator an hour before your event starts.
You’ll know when the coffee is done brewing when the indicator light turns on. The coffee urn will turn itself off and just keep your beverages at serving temperature.
Cleaning Up
Thankfully, cleaning up a large coffee maker isn’t too hard. All you need to do is follow the do’s and don’ts of cleanup.
Safety Tips
- Only plug in the coffee urn when you’ve put the water and grounds inside.
- Don’t let the electrical cord hang off the edge of a table, so as to avoid accidents.
- Keep the coffee pot away from other electrical appliances.
- Don’t touch the outside of the percolator, as it will be very hot.
- Turn off the coffee urn when there are only a few cups of coffee remaining.
- Wait until the coffee pot is cool to handle it.


Leave a Reply